Lesson 3 – From Rectangles to Triangles
Begin this lesson with a quick review of the dimensional requirements of the Golden Rectangle. After the first two lessons, students should be quite comfortable with the notion of a rectangle in which the length is phi times its width. Announce that there is such a thing as a Golden Triangle and facilitate a short discussion during which students speculate on its nature. Allow students, in pairs or small groups, to develop models for their conceptions of the Golden Triangle. Make both technological and traditional tools available for this purpose.
When it is appropriate, reveal the true nature of the Golden Triangle. If students have created accurate depictions, use their work as a starting point. Otherwise, lead students to imagine a Golden Rectangle that morphs into a Golden Triangle in the following manner:
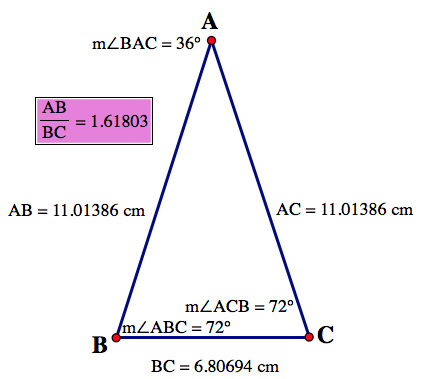
Use the image to the right and/or the Scratch file attached here to provide a visual representation of the Golden Triangle. Take care to ensure that the students understand the required side and angle measurements.
Begin this lesson with a quick review of the dimensional requirements of the Golden Rectangle. After the first two lessons, students should be quite comfortable with the notion of a rectangle in which the length is phi times its width. Announce that there is such a thing as a Golden Triangle and facilitate a short discussion during which students speculate on its nature. Allow students, in pairs or small groups, to develop models for their conceptions of the Golden Triangle. Make both technological and traditional tools available for this purpose.
When it is appropriate, reveal the true nature of the Golden Triangle. If students have created accurate depictions, use their work as a starting point. Otherwise, lead students to imagine a Golden Rectangle that morphs into a Golden Triangle in the following manner:
- the Golden Rectangle is oriented so the long sides are vertical
- the top edge (one of the short sides) disappears
- the two long sides fall inward and connect directly above the midpoint of the bottom side
- the result is an isosceles triangle in which the lengths of the two equal sides are phi times the length of the bottom
Use the image to the right and/or the Scratch file attached here to provide a visual representation of the Golden Triangle. Take care to ensure that the students understand the required side and angle measurements.

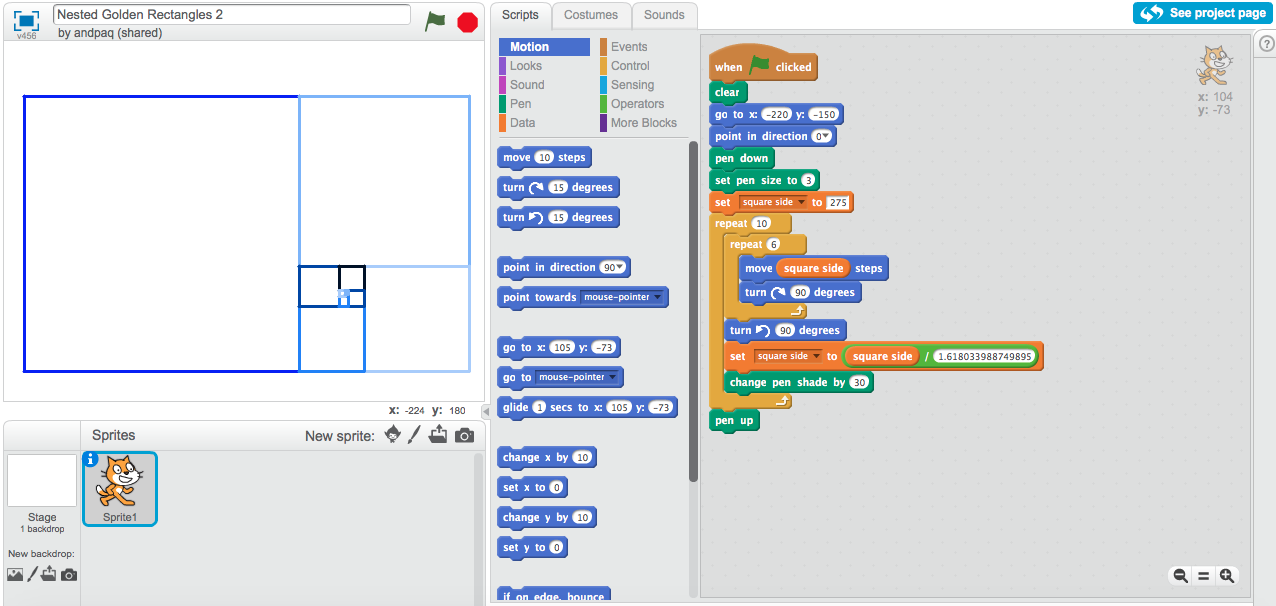
Provide students with copies of Nested Golden Rectangles (such as the one shown to the left). Have them investigate the nature of its construction. Prompt them to consider how the Golden Ratio might be involved beyond the dimensions of the largest rectangle. Lead them to an understanding that each successively smaller rectangle is golden. To assist in developing student understanding, you may choose to make use of Golden Ratio videos #4 and #5 linked here.
Show students Nested Golden Rectangles 1 and 2 on Scratch (linked below). Briefly discuss how the two files build the same image but in different ways. Wonder aloud if Golden Triangles can be nested in the same manner. As students provide their opinions on this, assign them the task of creating a similar image based on Golden Triangles. Allow each student to choose his/her preferred medium (e.g., paper and pencil, Geometer’s Sketchpad, Scratch). Make all three attached Scratch files available to the students so that they can, if they choose, modify them to create a coded Nested Golden Triangle file. As students work, circulate and provide feedback that will allow them to move closer to the desired end product. Once all students have finished the task, a gallery walk will allow everyone to benefit from the range of approaches in the room.
Show students Nested Golden Rectangles 1 and 2 on Scratch (linked below). Briefly discuss how the two files build the same image but in different ways. Wonder aloud if Golden Triangles can be nested in the same manner. As students provide their opinions on this, assign them the task of creating a similar image based on Golden Triangles. Allow each student to choose his/her preferred medium (e.g., paper and pencil, Geometer’s Sketchpad, Scratch). Make all three attached Scratch files available to the students so that they can, if they choose, modify them to create a coded Nested Golden Triangle file. As students work, circulate and provide feedback that will allow them to move closer to the desired end product. Once all students have finished the task, a gallery walk will allow everyone to benefit from the range of approaches in the room.

|
|
Reference
Jarvis, D. (2007). Mathematics and visual arts: Exploring the golden ratio. Mathematics Teaching in the Middle School, 12(8), 467-473. Retrieved from https://www.lib.uwo.ca/cgi-bin/ezpauthn.cgi?url=http://search.proquest.com/docview/231093806?accountid=15115
Jarvis, D. (2007). Mathematics and visual arts: Exploring the golden ratio. Mathematics Teaching in the Middle School, 12(8), 467-473. Retrieved from https://www.lib.uwo.ca/cgi-bin/ezpauthn.cgi?url=http://search.proquest.com/docview/231093806?accountid=15115